

Honey & Oat Cold Process Soap with Beeswax (a batch for learning)
This post contains affiliate links. As an Amazon associate I earn from qualifying purchases.
Hello friends 👋
I have wanted to make this cold process version of my honey and oat soap with beeswax for quite some time. I’d also been receiving a lot of requests to make this video and my contact with Prem Kumar from Reforest India and his question about recipes that use honey and beeswax gave me the final prompt to try this out (watch the video here for the full story).
I normally make this soap using the hot process method, which works wonderfully!
You can see my original video and recipe for that soap here (it was my first ever HP soap recipe video, and nice to revisit) —> Using beeswax and honey in cold process soap making, on the other hand, is a little more challenging!
Below is the recipe and method for this new cold process version, as seen in the video. It is very similar to my original HP recipe, however I increased the cocoa butter and coconut oil amounts slightly for extra hardness and a bigger lather. The beeswax and honey amounts are in the same proportions as the original recipe, but for the new version I used macadamia nut oil instead of sweet almond oil (they have similar fatty acid profiles).
Honey & Oat Cold Process Soap with Beeswax
If you are new to soap making, please make sure you fully understand the safety implications of making your own soap at home and watch this important video and visit this page.
SPECIFICATIONS
This recipe makes 1350g total finished soap
This may vary depending on the amounts of additives you use. You will need a mould of at least 1.5 litre capacity to make this soap comfortably (about 3.3 pounds).It uses 940g base oils
I tailored the oil batch size for this recipe to suit my crafter’s choice log mould and the three small individual silicone moulds I wanted to use.I used 5% superfat
My HP recipe had 4% superfat, I decided to increase it slightly for this version.I used 2:1 water to lye ratio
This equates to a 33% lye concentration lye-water solution, very close to the 35% lye-water solution I used for the HP recipe - I’m calculating my recipes using the water to lye ratio method these days, it’s less confusing for people I think.My moulds
I used my Crafter’s Choice standard log mould, which you can find here (ad link) if you can’t source one at a local supplier. I also used three small silicone individual moulds, each with 90g total capacity (I bought them at a charity shop). If I were making this soap again, I would use all individual silicone moulds to stop the soap overheating during the gel-phase, and to prevent cracking during cutting.
*See the sections below the recipe for more information on these points.
INGREDIENTS
Lye solution:
252g water
126g sodium hydroxide (NaOH)
I used chilled, filtered rainwater from my household rainwater tank to make the lye solution for this soap. I’ve been using it a lot lately and it seems to be a wonderful, soft water that’s perfect for soap making. Any clean, soft to moderately soft water will be suitable.Liquid oils:
517g olive oil
141g coconut oil (I melted mine to make it liquid, I find it easier to measure that way)
47g castor oil
94g macadamia nut or sweet almond oilHard oils/wax:
122g cocoa butter
19g beeswax
My beeswax and cocoa butter were in bead/pellet form, purchased from an online supplier. You can use raw butters and waxes if that’s what you have.1 tablespoon / 24g honey
This equates to about 2.5% of the total base oil amount.1 tablespoon / 10-12g oat flour
I grind rolled oats in the blender to make a rough ‘flour’ consistency for soap making. You can use less, or a bit more if you like. Oats give some nice, light exfoliation to this soap and a small amount of extra superfatting due to the fat content of oats (oats are about 7% fat).1 tsp white kaolin clay
This ingredient is completely optional. I use it to add extra slip to the soap and to keep the recipe as true as possible to the original HP version.19g honey fragrance oil (2% of base oils)
I used this L'Occitane type honey fragrance oil from Escentials of Australia, however this ingredient is completely optional and you can leave it out if you like, or add another fragrance or essential oil of your choosing. I’m just using up some of my old supply (and some of my friends love this fragrance).
* If I were using an essential oil for this soap, I’d probably go with eucalyptus radiata - somehow I think that would go beautifully in a honey soap. I would also increase the amount if using eucalyptus essential oil - about 25g (3% of base oils).
METHOD
View the video for this recipe, if you haven’t already seen it. This can be a tricky soap to make and the video demonstration might be useful :)
Weigh beeswax and cocoa butter into a saucepan or other suitable pot for melting oils on the stove. You can also melt your oils together in a microwave on low power, but I find the stovetop easier (less moving of the container to check the temperature). I used a second-hand stainless steel saucepan I bought especially for soap making. I made the entire soap batch in this saucepan in the video demonstration.
Weigh liquid oils into a separate container (or the same pot if you are confident and very attentive) and mix with the cocoa butter and beeswax.
Begin to melt the oils/wax mixture on low heat while you make the lye solution and prepare the other ingredients, checking and stirring periodically.
To make the lye solution, first weight out the water into a heat-safe plastic or stainless steel container. See this page for more information about containers. Don your safety gear (goggles, gloves and mask) and carefully weigh the sodium hydroxide into a separate container and cover until you are ready to mix the solution (I use a small food container with a lid, which stops the sodium hydroxide from becoming damp, it is extremely hygroscopic!). When you are collected and ready, and there are no distractions or children/pets around, slowly pour the sodium hydroxide into the water (never the other way around!), stirring to dissolve. Once the granules are completely dissolved, set the solution aside somewhere safe.
Monitor the oils and beeswax melting on the stove. Heat to about 70°C/158°F if you can. The mixture will need to be heated to at least 65°C/149°F for the beeswax to melt.
Without delay (you don’t want your lye solution to cool off too much), prepare your additives (honey, oats, kaolin clay and fragrance oil/EO) and equipment (moulds, stick blender, spatulas, whisk etc.).
When the oil mixture is around 65°C (149°F) mix the oats, honey, clay and fragrance into the oil/wax mixture and blend to distribute evenly. If you are not using the clay, a whisk would be sufficient for this task.
When you are ready (safety gear still on!), carefully pour the lye solution into the oils and begin to stir the mixture. Whisk by hand until you achieve a trace, or for a faster result use a stick blender in short bursts. Due to the honey, beeswax and cocoa butter in this recipe, it will be quite fast to trace. Make sure your moulds are ready!
Once the mixture has thickened to a light trace, pour into the mould/s without delay.
Do not insulate or cover this soap, just allow it to set at room temperature to avoid overheating. Check out the video to see what can happen if this soap becomes too hot!
Leave the soap to set until firm enough to cut (if you used a log mould) or take out of individual moulds.
Cut the soap when it’s firm enough to do so, and cure it for 4-6 weeks before using. The soap should be safe to test a small piece within a day or two of making (if, like me, you can’t resist), but make sure you test the soap with pH test strips before you use it in any capacity, to ensure it is fully saponified and is safe to use. This video demonstrates how to do that if you are not sure.
Enjoy! This soap has a lovely lather and lasts well in the shower with everyday use. I will do a follow-up test video for this CP recipe soon, but in the meantime, here is the lather test video for the HP version.
The Main Considerations
Cold Process Versus Hot Process Honey & Beeswax Soap
I haven’t fully cured my new cold process honey & oat soap yet, so the jury is still out in terms of whether or not I prefer it to the hot process version, but here are a few points I’d like to make from my experience so far with both methods, which may influence your approach.
Adding honey to any soap recipe is a nice technique to try, but it has challenges. Honey (any sugars in fact) boosts the lather of handmade soap, however it also accelerates the saponification reaction and can lead to discolouration and volcanoing of the soap if you are not careful. You may enjoy the rustic caramel colour of cold process soap with honey added, however if you prefer a lighter colour, you may prefer to use the hot process method whereby the honey is added after the soap is cooked/saponified, just before moulding, which eliminates any chance of scorching and discolouring of the soap. You can also use less honey than I did for a less dramatic acceleration effect.
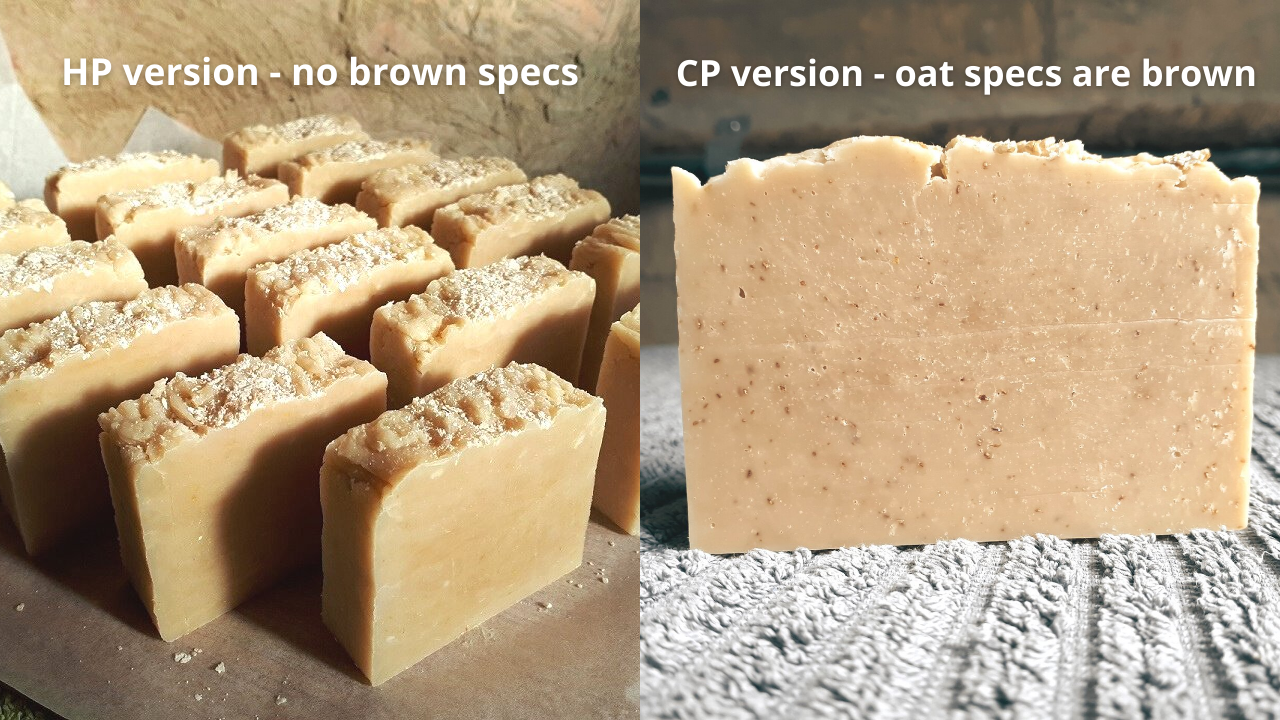
The same goes for oats - you may have noticed that the little specs of ground oats in this cold process version were a darker brown colour compared to the hot process version, where they were barely visible! (See photo below). Due to the natural sugars/carbohydrates in ground oats, they are also subject to scorching during saponification, which can be avoided in the hot process method if they are added with the honey at the end of the cook. (See the hot process version video to see how the process differs).
Keeping the colour lighter using the cold process method can be achieved by using individual silicone soap moulds. In individual moulds, the soap will not become hot enough to go through a gel-phase, which scorches the oats in the cold process version. However, if you, like me, prefer your soap to be gelled (lots about that in the blog post here and the video here) then you may want to use the hot process method to avoid brown specs in the soap. Personally, I quite like the brown oat specs in the new CP version.
How much beeswax can you use in soap? Personally, I think 2% of the base oils is a good level of beeswax in a handmade soap recipe (hot or cold process), though I’ve never tried a higher amount. The more beeswax is added, the faster the soap will saponify, the more brittle it will be and more care will be required to make it. Too much wax can also make the soap feel waxy and inhibit the lather. I’d like to try a higher percentage of beeswax in a soap one day (perhaps 5%?) but I would definitely use individual moulds and make a small test batch.
If you would like to try different oils and wax amounts in this or any other soap recipe, these videos are helpful in learning how to formulate and calculate your own recipes:
What Would I Do Differently Next Time?
Watch my oil pot and take it off the heat once the oils and wax reached 70°C/158°F
Because I allowed my oils to overheat, they took longer to cool down to the ideal temperature and by this time my lye solution was becoming too cool. I actually heated my lye solution in the microwave on low power to bring it back up to 65°C, but I don’t recommend doing this. Warming your lye solution in a hot water bath is a much safer option. It may also be the case that I was over-concerned about the temperatures for this batch and it may have been perfectly fine to make the soap with 70°C oils and a cooler lye solution. The nature of beeswax had me very cautious about temperature in the making of this soap!Pour the soap a bit earlier
I overmixed this soap and it became too thick to pour evenly into my moulds, especially the small silicone ones. Next time I would probably just take my time, whisk the soap manually and pour it at a very light trace/emulsion to ensure that I get a really nice smooth top (which I prefer to chunky tops).Use individual silicone moulds
This soap would have been so lovely in some individual moulds, perhaps my flower moulds or simple rounds using my silicone muffin pan moulds. Using individual moulds would have prevented the ground oats from scorching and would have avoided the issue of the soap cracking when I cut it.Try it with eucalyptus essential oil
I quite like the fragrance oil I used in this recipe, but ideally I prefer to use essential oils in my soap recipes and I’d love to try eucalyptus with this recipe. Somehow in my mind I think eucalyptus radiata would go nicely with a honey soap. I might try this recipe again someday with 25g of eucalyptus EO instead of the 19g honey FO.
Overall, I was really happy with this soap! As it cures the colour and fragrance are mellowing, which is nice I think.
Thanks for reading and watching, I hope you enjoy the recipe. Make sure you have a look through my blog page and see if there are any other soap making topics you might want to explore.
You can see my full listing of soap making videos here: Elly’s Everyday Soap Making - VIDEOS
If you have any comments or questions, please don’t hesitate to ask them below, or in the comments section under the video in YouTube.
If you’d like to support my work further, please visit my Buy Me a Coffee Page. Thank you to everyone for your generous support.
Happy soap making!
Elly 🌸
To comment:
Type your comment and click ‘post comment’
Enter your first name or an initial/symbol (any character will do the trick - it just needs to have something in the name field)
Click ‘comment as guest’ and your comment will be published.